ImageMagickの旧覚書
	■概要
	 ImageMagickを使うと、サイズを変えたサムネイル画像を作成したり、形式(拡張子)が異なる画像に変換できる。(TIF→PNGなど)
	 ImageMagickはサーバー側にインストールされている。さくらサーバーにもインストールされているが、perl専用のため、専用クラス(imagemagickクラス)が利用できない。しかしsystem関数によるコマンド型で、利用することができる。
	 ImageMagickはVBやC++などからも利用できる。おそらくJavaでも・・

	■設定手順

	1.ImageMagickを以下のサイトからダウンロードする。
		ダウンロードサイト:http://imagemagick.org/script/binary-releases.php#windows
		いくつか種類があるが、初回はImageMagick-6.7.4-7-Q8-windows-dll.exeを入手

	2.ImageMagickをインストールする。
		ImageMagick-6.7.4-7-Q8-windows-dll.exeを実行し、ウィザードに従ってゆく。途中perl用,C++用などの選択があるが、とりあえずperl用にチェックを入れておけばよい。(チェックなしでも問題ない可能性もある)

	3.PC再起動
		環境パスへ設定されると思われる。

	4.PHP用拡張ライブラリをダウンロード
		ダウンロードサイト:http://valokuva.org/outside-blog-content/imagick-windows-builds/080709/
		拡張ライブラリはいくつか種類があるが、とりあえず、環境によりどれが動作するか不明のため、すべて入手。
		拡張ライブラリにはphp_imagick_dyn-Q16.dll、	php_imagick_st-Q16.dllなどがある。

	5.PHP用拡張ライブラリをPHPディレクトリの指定場所に配置する。
		配置場所の例としてC:¥web¥PHP¥ext

	6.php.iniに設定を追加
	以下の記述を追加する。
		extension_dir = "C:¥web¥PHP¥ext"
		extension=php_imagick_st-Q16.dll

		extension_dirはextディレクトリを有効にするための設定かと思われる。extディレクトリはデフォルトでは存在しないため。ImageMagickとは無関係のライブラリでも利用する場合があるので、既存がないか要確認。
		extensionには、上記でダウンロードした、拡張ライブラリ名を指定。複数の拡張ライブラリをダウンロードしたが、そのうち動作する拡張ライブラリの名前を指定。動作確認はApacheの再起動で確認できる。動作不能な拡張ライブラリの場合、エラーがでて再起動に失敗する。
		Apacheを再起動を忘れずに。

	■サンプルコード(クラス利用型)
	<?
	$im = new imagick( '../files/023.TIF' );
	$im->thumbnailImage( 200, 0);
	$im->writeImage( '../files/023.png' );

	echo "test003 success!!";
	?>
	■サンプルコード2(system関数利用型)
	<?
	system("convert -geometry 20% 023.TIF 023.png");
	echo "success!!";
	?>

	※convertコマンドの使い方
	http://www.envinfo.uee.kyoto-u.ac.jp/user/susaki/image/magick_process.html

	■参考サイト
	http://www.elxsy.com/2009/07/installing-imagemagick-on-windows-and-using-with-php-imagick/
	http://q.hatena.ne.jp/1101107667
	http://blog.quall.net/linuxserver/505/
ページネーション
デモ
<?php
$page_no = 0;
if(!empty($_GET['page_no'])){
$page_no = $_GET['page_no'];
}
$base_url = "/sample/php/a040/pagenation/pagenation.php";
$all_data_cnt = 100;
$row_limit = 10;
$midasi_cnt = 5;
$params = ['a' => 'neko' , 'b' => 'buta'];
$res = createpagenationHtml($base_url, $page_no, $all_data_cnt, $row_limit, $midasi_cnt, $params);
echo $res['mokuji'];
/**
* ページネーション用の目次HTMLを作成する
* @param int $page_no 現在のページ番号(0から開始)
* @param int $all_data_cnt 全データ数
* @param int $row_limit 行制限数(LIMIT)
* @param int $midasi_cnt 表示するペースの数
* @param array $params リンクのURLに付加するパラメータ(キー、値)
* @param array $option
* - page_field ページフィールド名: def→ page_no
* @return array ページネーションデータ
*/
function createpagenationHtml($base_url, $page_no, $all_data_cnt, $row_limit, $midasi_cnt, $params, $option = array()){
// ページネーションデータ
$pagenationData = array(
'mokuji'=>'', // 目次HTML
'page_prev_link'=>'',
'page_next_link'=>'',
'page_top_link'=>'',
'page_last_link'=>'',
'query_str'=>'',
'base_url' => $base_url,
'page_no' => $page_no,
'all_data_cnt' => $all_data_cnt,
'row_limit' => $row_limit,
'midasi_cnt' => $midasi_cnt,
);
if($all_data_cnt == 0) return $pagenationData;
if(empty($row_limit)) return $pagenationData;
// オプションの初期化
if(empty($option['page_field'])) $option['page_field'] ='page_no';
$page_field = $option['page_field'];
//▼ページネーションを構成する総リンク数をカウントする。
$allMdCnt = ceil($all_data_cnt / $row_limit);
$md2 = $allMdCnt;
if($md2 > $midasi_cnt){
$md2 = $midasi_cnt;
}
$linkCnt =4 + $md2;
//▼最終ページ番号を取得
if($md2 > 0){
$lastPageNo = $allMdCnt-1;
}
$strParams='';
if(!empty($params)){
//▼その他パラメータコードを作成する。
foreach($params as $key=>$val){
if($val !== null && $val !== '')
$strParams = $strParams.'&'.$key.'='.$val;
}
}
//▼最戻リンクを作成
$page_top_link = '';
$rtnMax = '<<';
if($page_no > 0){
$url = "{$base_url}?{$page_field}=0{$strParams}";
$page_top_link = $url;
$rtnMax="<a href='{$url}'>{$rtnMax}</a>";
}
//▼単戻リンクを作成
$rtn1='<';
$page_prev_link = '';
if($page_no > 0){
$p=$page_no - 1;
$url = "{$base_url}?{$page_field}={$p}{$strParams}";
$page_prev_link = $url;
$rtn1 = "<a href='{$url}'>{$rtn1}</a>";
}
//▼単進リンクを作成
$page_next_link = '';
$next1='>';
if($page_no < $lastPageNo){
$p=$page_no + 1;
$url = "{$base_url}?{$page_field}={$p}{$strParams}";
$page_next_link = $url;
$next1 = "<a href='{$url}'>{$next1}</a>";
}
//▼最進リンクを作成
$page_last_link = '';
$nextMax='>>';
if($page_no < $lastPageNo){
$p=$lastPageNo;
$url = "{$base_url}?{$page_field}={$p}{$strParams}";
$page_last_link = $url;
$nextMax="<a href='$url'>{$nextMax}</a>";
}
//▼見出し配列を作成
$fno=$lastPageNo - $md2 + 1;
if($page_no < $fno){
$fno=$page_no;
}
$lno = $fno + $md2 - 1;
for($i = $fno; $i <= $lno; $i++){
$pn=$i+1;
if($i!=$page_no){
$url = "{$base_url}?{$page_field}={$i}{$strParams}";
$midasiList[]="<a href='$url'>{$pn}</a>";
}else{
$midasiList[]=$pn;
}
}
//▼HTML組み立て
$html = "<div id='page_index'>";
$html .= "{$rtnMax} ¥n";
$html .= "{$rtn1} ¥n";
foreach($midasiList as $key=>$val){
$html .= "{$val} ¥n";
}
$html .= "{$next1} ¥n";
$html .= "{$nextMax} ¥n";
$html .= "</div>¥n";
// クエリ文字列
$query_str = "{$page_field}=0{$strParams}";
$pagenationData['mokuji'] = $html;
$pagenationData['page_prev_link'] = $page_prev_link;
$pagenationData['page_next_link'] = $page_next_link;
$pagenationData['page_top_link'] = $page_top_link;
$pagenationData['page_last_link'] = $page_last_link;
$pagenationData['query_str'] = $query_str;
return $pagenationData;
}
?>
タグ除去
	$test_str = "
		<div class=¥"yohaku¥"></div>

		<ol class=¥"breadcrumb¥">
			<li><a href=¥"/¥">ホーム</a></li>
			<li><a href=¥"/sample¥">サンプルソースコード</a></li>
			<li><a href=¥"/sample/php¥">PHP | サンプル</a></li>
			<li>タグ除去</li>
		</ol>
		<p>TEST</p>
	";

	echo '<p>出力</p><pre>';
	$test_str = strip_tags($test_str,'<a><p>'); // AタグとPタグだけ除外
	echo $test_str;
	echo '</pre>';
GCPへの登録から「Google Translate API」をPHPで動かすところまでの手順
Google Translate APIは無料期間もあるが有料サービスなので注意。手順
-
まずはGCP(Google Clound Platform)に登録する必要がある。
Googleにログインした状態(GMailログインなど)でGCPの「https://cloud.google.com/」にアクセスする。
「無料トライアル」ボタンを押して登録手続きを進める。

-
登録が出来たら、GCPの管理画面が表示される。
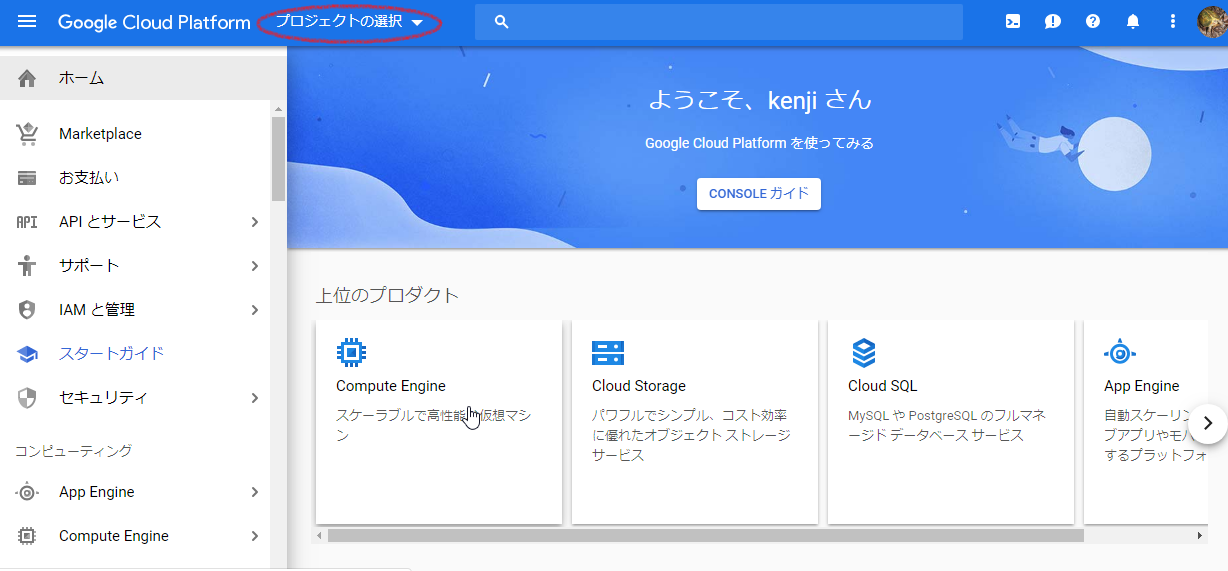
最初に行うのはプロジェクトの選択。上部メニューの「プロジェクトの選択」から任意のプロジェクトを選択する。
ここでは最初から用意されている「API Project」を選択する。
-
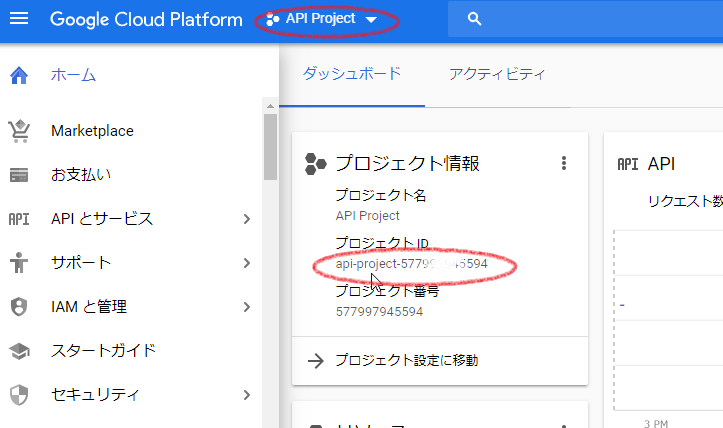
後の手順でプロジェクトIDが必要になるのでプロジェクトIDの控えを保持しておく。
-
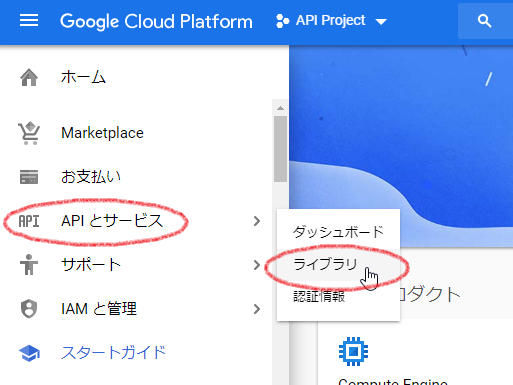
「Google Translate API」を有効にするため、「Google Translate API」の管理ページに移動する。
左側メニューの「APIとサービス」から「ライブラリ」を選択。
-
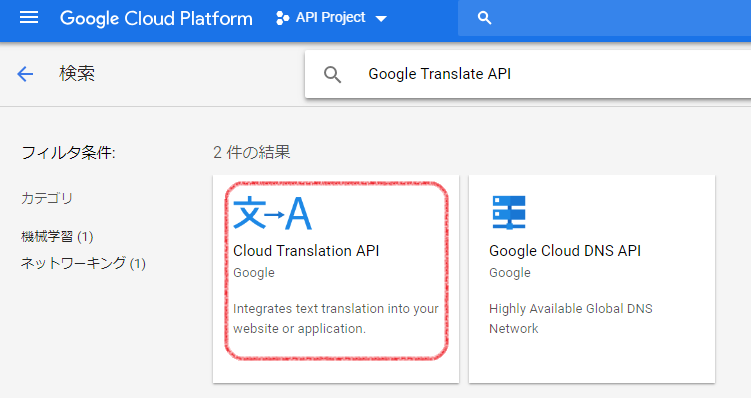
検索テキストボックスに「Google Translate API」を入力して検索する。

-
「Clound Translation API」を選択
-
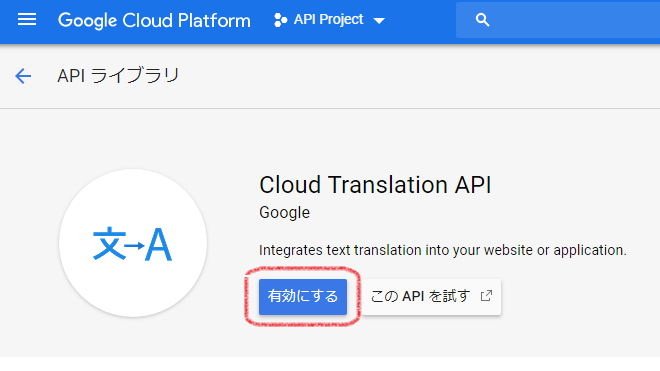
「有効にする」ボタンを押して、「Google Translate API」を使えるようにする。
-
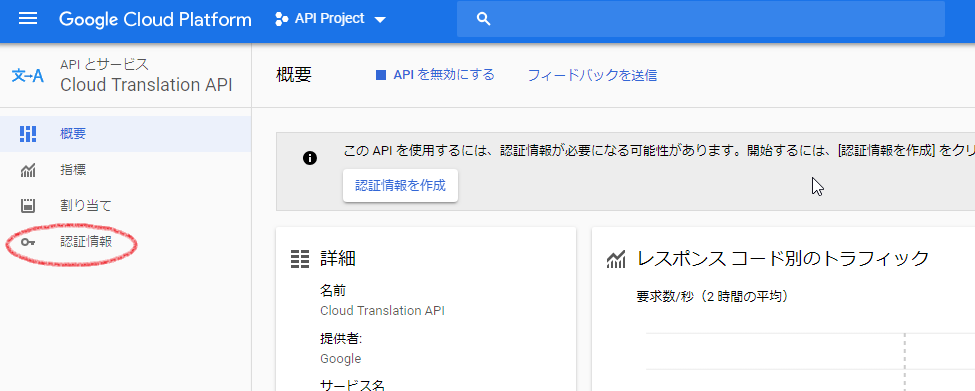
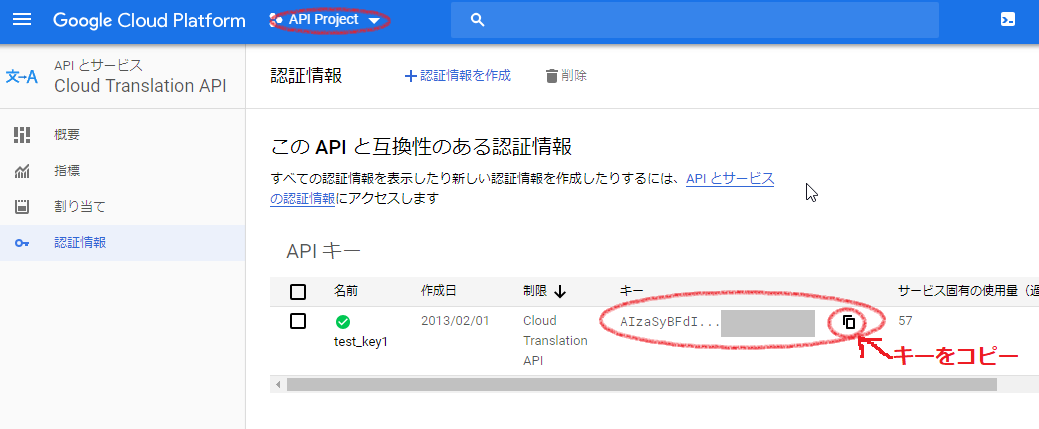
続いて「キー」を取得するため左側メニューの「認証情報」からキーを確認する。(無ければキーを作成する)
下記の手順で必要になるのでキーの控えをコピーして保持しておく。
-
続いてPHP側。
適当にPHPのプロジェクトを用意する。
-
composerで専用ライブラリ「TranslateClient」をインストールする。
composer.json{ "require": { "google/cloud-translate": "*" } } -
「Clound Translation API」をPHPで使用してみる。
	// composerでインストールしたライブラリをインクルードする。
	require_once 'vendor/vendor/autoload.php';

	// 「Clound Translation API」使うためのライブラリを使用宣言する。
	use Google\Cloud\Translate\TranslateClient;

	// 「プロジェクトID」をセットする
	$projectId = 'api-project-5779xxxxxxxxx';

	// 認証情報で確認したキーをセットする。
	$apiKey = 'AIzaSyBFdIWjxxxxxxxxx';

	// 「TranslateClient」クラスを呼び出し
	$translate = new TranslateClient([
		'projectId' => $projectId,
		'key' => $apiKey,
	]);

	// 翻訳する言語を指定。
	$lang = "en"; // 英語

	// 翻訳開始
	$result = $translate->translate("私の猫を捕まえてください。
この猫はキジトラの雄です。", [
		'target' => $lang,
	]);

	// 翻訳結果を表示
	var_dump($result);
出力array(4) { ["source"]=> string(2) "ja" ["input"]=> string(82) "私の猫を捕まえてください。 この猫はキジトラの雄です。" ["text"]=> string(59) "Please catch my cat. This cat is a males of the quail." ["model"]=> NULL } -
PHPでの「Google Cloud Translation API」の使い方は以上で終わり。
Google Translate API | 言語リストを取得
PHPプロジェクトにあらかじめ「TranslateClient」をcomposerでインストールしておくこと。
	require_once 'vendor/vendor/autoload.php';
	use Google\Cloud\Translate\TranslateClient;

	//Google APIの「プロジェクトID」
	$projectId = 'api-project-5779xxxxxx';

	// 認証情報のキー
	$apiKey = 'AIzaSyBFdIWjLXlyGV8axxxxxxxxxxxx';

	// 「TranslateClient」クラスを呼び出し
	$translate = new TranslateClient([
	'projectId' => $projectId,
	'key' => $apiKey,
	]);

	// 言語リストを取得
	$langList = $translate->languages();
	var_dump($langList);
出力
OKarray(104) { [0]=> string(2) "af" [1]=> string(2) "am" [2]=> string(2) "ar" [3]=> string(2) "az" [4]=> string(2) "be" [5]=> string(2) "bg" [6]=> string(2) "bn" [7]=> string(2) "bs" [8]=> string(2) "ca" [9]=> string(3) "ceb" [10]=> string(2) "co" [11]=> string(2) "cs" [12]=> string(2) "cy" [13]=> string(2) "da" [14]=> string(2) "de" [15]=> string(2) "el" [16]=> string(2) "en" [17]=> string(2) "eo" [18]=> string(2) "es" [19]=> string(2) "et" [20]=> string(2) "eu" [21]=> string(2) "fa" [22]=> string(2) "fi" [23]=> string(2) "fr" [24]=> string(2) "fy" [25]=> string(2) "ga" [26]=> string(2) "gd" [27]=> string(2) "gl" [28]=> string(2) "gu" [29]=> string(2) "ha" [30]=> string(3) "haw" [31]=> string(2) "hi" [32]=> string(3) "hmn" [33]=> string(2) "hr" [34]=> string(2) "ht" [35]=> string(2) "hu" [36]=> string(2) "hy" [37]=> string(2) "id" [38]=> string(2) "ig" [39]=> string(2) "is" [40]=> string(2) "it" [41]=> string(2) "iw" [42]=> string(2) "ja" [43]=> string(2) "jw" [44]=> string(2) "ka" [45]=> string(2) "kk" [46]=> string(2) "km" [47]=> string(2) "kn" [48]=> string(2) "ko" [49]=> string(2) "ku" [50]=> string(2) "ky" [51]=> string(2) "la" [52]=> string(2) "lb" [53]=> string(2) "lo" [54]=> string(2) "lt" [55]=> string(2) "lv" [56]=> string(2) "mg" [57]=> string(2) "mi" [58]=> string(2) "mk" [59]=> string(2) "ml" [60]=> string(2) "mn" [61]=> string(2) "mr" [62]=> string(2) "ms" [63]=> string(2) "mt" [64]=> string(2) "my" [65]=> string(2) "ne" [66]=> string(2) "nl" [67]=> string(2) "no" [68]=> string(2) "ny" [69]=> string(2) "pa" [70]=> string(2) "pl" [71]=> string(2) "ps" [72]=> string(2) "pt" [73]=> string(2) "ro" [74]=> string(2) "ru" [75]=> string(2) "sd" [76]=> string(2) "si" [77]=> string(2) "sk" [78]=> string(2) "sl" [79]=> string(2) "sm" [80]=> string(2) "sn" [81]=> string(2) "so" [82]=> string(2) "sq" [83]=> string(2) "sr" [84]=> string(2) "st" [85]=> string(2) "su" [86]=> string(2) "sv" [87]=> string(2) "sw" [88]=> string(2) "ta" [89]=> string(2) "te" [90]=> string(2) "tg" [91]=> string(2) "th" [92]=> string(2) "tl" [93]=> string(2) "tr" [94]=> string(2) "uk" [95]=> string(2) "ur" [96]=> string(2) "uz" [97]=> string(2) "vi" [98]=> string(2) "xh" [99]=> string(2) "yi" [100]=> string(2) "yo" [101]=> string(2) "zh" [102]=> string(5) "zh-TW" [103]=> string(2) "zu" }
通信を行う関係上、処理は遅いので注意。AJAXで利用するのが望ましい。カレントディクトリパスを取得 getcwd()
var cur_dir = getcwd(); // → 「/cake_demo/app/webroot」など
PhantomJSで動的HTMLをスクレイピング(Windowsローカル環境)
まず、PhantomJSをComposerでインストール。composer.json
	{
	    "scripts": {
	        "post-install-cmd": [
	            "PhantomInstaller\\Installer::installPhantomJS"
	        ],
	        "post-update-cmd": [
	            "PhantomInstaller\\Installer::installPhantomJS"
	        ]
	    },
	    "require": {
	        "jonnyw/php-phantomjs": "4.*"
	    }
	}
PHP(このコードはWindowsのローカル環境でしか動かない)
	require_once 'vendor/autoload.php';
	use JonnyW¥PhantomJs¥Client;
	$client = Client::getInstance();

	// Phantomjs.exeエンジンを設定
	$client->getEngine()->setPath('vendor¥bin¥phantomjs.exe');

	$request  = $client->getMessageFactory()->createRequest();
	$response = $client->getMessageFactory()->createResponse();
	$request->setTimeout(120 * 1000); // 最大2分待つ。2分を超えるとステータス408エラーが返る。

	$request->setMethod('GET');
	$url1 = 'http://www.example.com/'; // スクレイピングするURLを指定する
	$request->setUrl($url1);
	$client->send($request, $response);

	if($response->getStatus() === 200) {
		echo $response->getContent();
	}else{
		echo "request url: " . $request->getUrl() . "<br>";
		echo "response: " . $response->getStatus() . "<br>";
		echo 'ログ<br>';
		echo $client->getLog();
	}
execが動かしているもの
exec()コマンドはLinux系OSだとLinuxコマンドを実行するが、Windows系だとコマンドプロンプトのコマンドを実行する。PHP
	$res_str = '';
	if($_SERVER['SERVER_NAME'] == 'localhost'){
		// Windowsローカル環境ではコマンドプロンプトのコマンドを実行する
		$res_str =  exec("cd"); // → C:\xampp\htdocs\sample\php\a040\exec_background
		$res_str = mb_convert_encoding($res_str, 'utf8' ,"SJIS"); // shift-jisなのでutf8にエンコードする必要がある。
	}else{
		// Linux系のサーバーなのでLinux系のコマンドを実行する
		$res_str =  exec("pwd"); // → home/amaraimusi/www/sample/php/a040/exec_background
	}
OSを調べる
echo PHP_OS; // Windowsなら「WINNT」が表示される
バックグラウンド(非同期)でPHPを実行する
	<?php

	$t1 = microtime(true);
	echo 'START<br>';

	// バックグラウンド(非同期)でPHPを実行する
	execPhpByBackground('test.php');

	$t0 = microtime(true) - $t1;
	echo $t0 . 'ms<br>';
	echo 'END<br>';

	/**
	 * バックグラウンド(非同期)でPHPを実行する
	 * @param string $php_fp PHPファイルパス
	 */
	function execPhpByBackground($php_fp){

		if (PHP_OS == 'WIN32' || PHP_OS == 'WINNT') {
			// Windowsである場合のPHP非同期実行
			$fp = popen('start php test.php', 'r');
			pclose($fp);
		}else{
			// Linux系である場合のPHP非同期実行
			// → nohupはkillを防ぐ役割、「/dev/null &」は出力の除去を表す
			exec("nohup php -c '' 'test.php' > /dev/null &");

		}

	}
	<?php
	$a=0;
	for($i=0;$i<10000000;$i++){
		$a++;
	}
	echo 'Hello World! こんにちは世界';

	$file = 'test.txt';
	$text = 'バックグラウンド処理成功=' . $a;
	file_put_contents( $file, $text );