ソフトマックス関数
ソフトマックス関数は配列の数値を0~1の値に変換する。また変換後の合計は1になる。
import numpy as np
import matplotlib.pyplot as plt #グラフ描画ライブラリ

def softmax(x):
	c = np.max(x)
	exp_x = np.exp(x - c)
	sum_exp_x = np.sum(exp_x)
	y = exp_x / sum_exp_x
	return y

x = np.arange(-10,10,2); #-10から10まで2刻みの配列を作成する
y = softmax(x)

print(x)

#yの総和は1になる
print(y)
print(np.sum(y))

# グラフ描画
plt.plot(x,y)
plt.show()
出力
	[-10  -8  -6  -4  -2   0   2   4   6   8]
	[  1.31688261e-08   9.73051952e-08   7.18993546e-07   5.31268365e-06
	   3.92557175e-05   2.90062699e-04   2.14328955e-03   1.58368867e-02
	   1.17019645e-01   8.64664719e-01]
	1.0

Eclipse:pyDevプラグイン:複数コメントアウトのショートカット
Pythonのコメントは「#」だが、PHPと同じように複数選択後、「Ctrl + / 」で複数コメントアウトができる。コメント解除はもう一度「Ctrl + / 」。
Winpythonで実行ファイル(exe)を作成 | Selenium
-
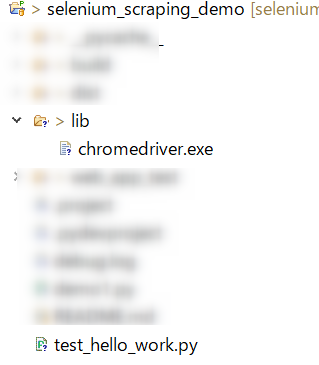
Seleniumでハローワークから40歳求人を検索するプログラム「test_hello_work.py」を予め作成しておく。
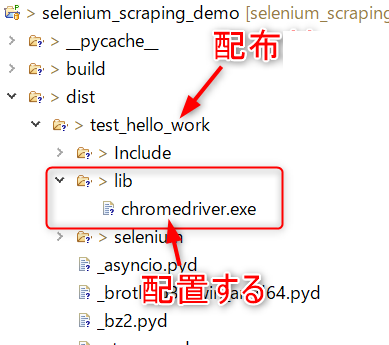
プロジェクトディレクトリ内にChromeDriver(chromedriver.exe)を配置している。
ファイル構成
-
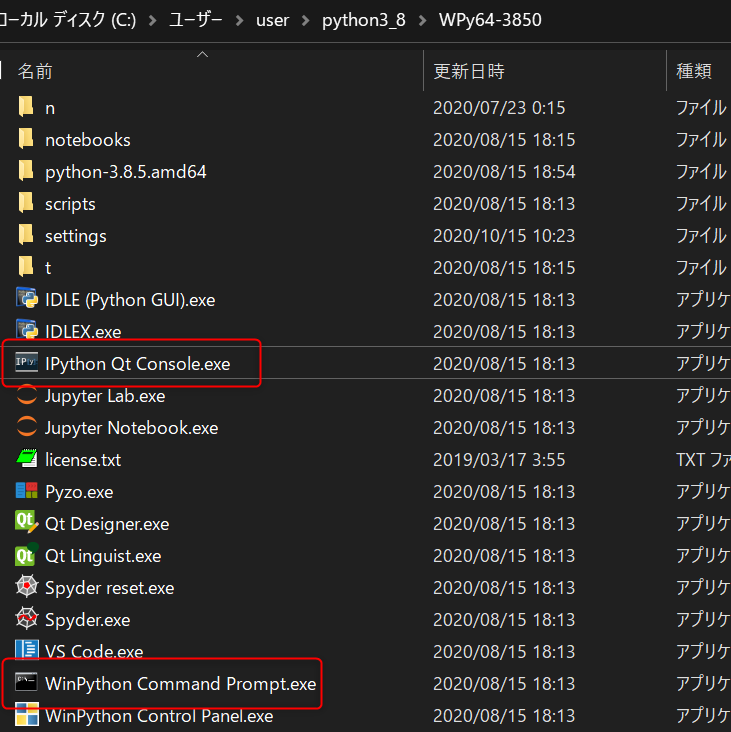
Winpythonパッケージ内のIPython Qt Console.exe、またはWinPython Command Prompt.exeを起動してコマンド入力できる状態する。
-
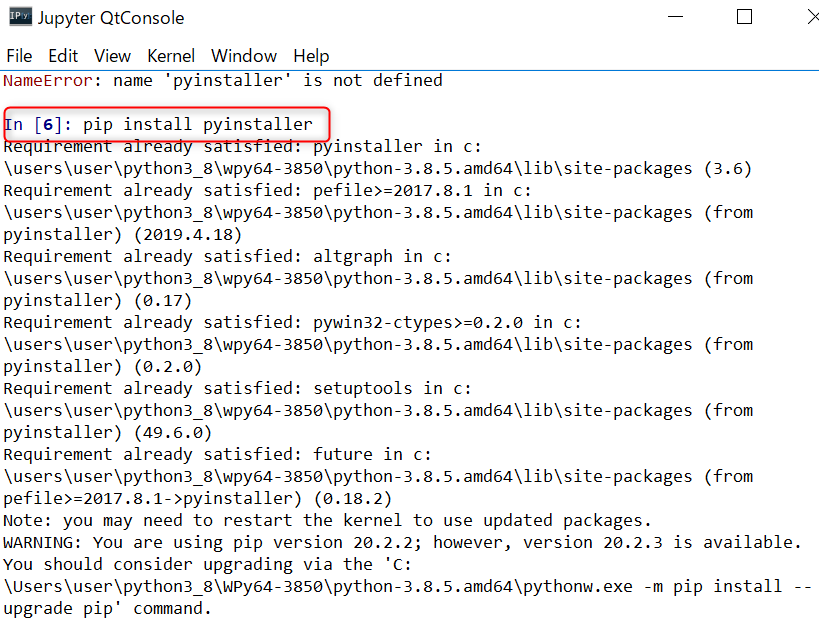
pythonソースコードファイルからWindows用のexeファイルを作成するツール「pyinstaller」をインストールする。
今回はWinPython Command Prompt.exeを起動して、下記コマンドを実行し、「pyinstaller」をインストール。
$ pip install pyinstaller
-
exeファイルの作成を行う。
今回はWinPython Command Prompt.exeを開いてコンソールを立ち上げ、 cdコマンドでpythonソースコードが存在するディレクトリに移動する。(「test_hello_work.py」が存在するディレクトリ)
対象のpythonソースコードファイルを指定して、exeファイルを作成するコマンドを実行。pyinstaller test_hello_work.py
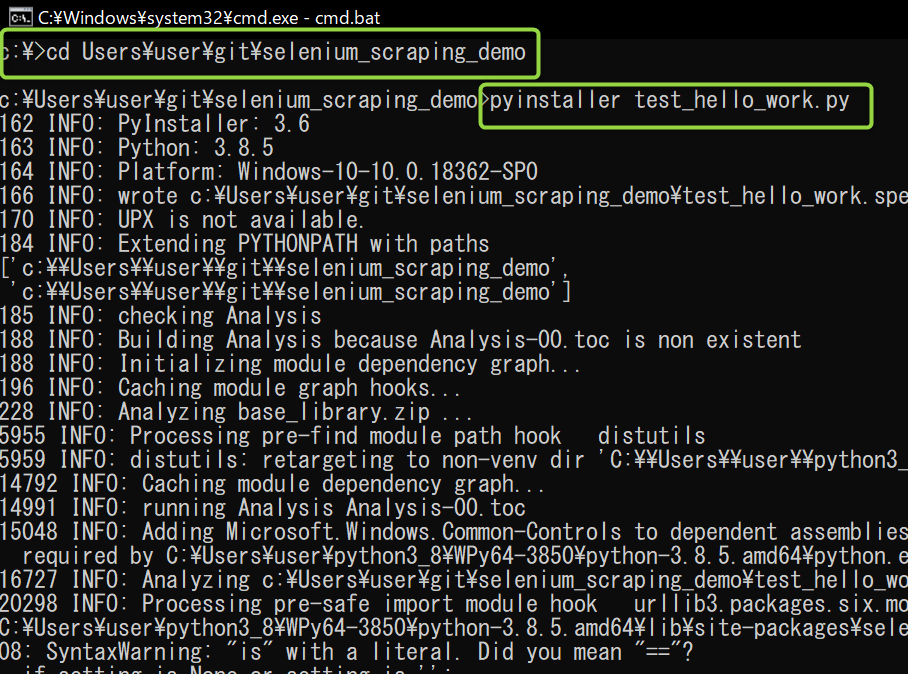
しばらく処理が続いた後、 「INFO: Building COLLECT COLLECT-00.toc completed successfully.」と出れば成功。 -
exeファイルの作成に成功した場合、
pythonソースコードファイルの存在するディレクトリにdistフォルダが作成されている。
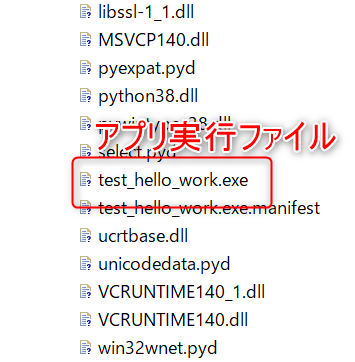
distフォルダにはプロジェクト名のフォルダ(test_hello_work)が作成され、その中にexeファイル(test_hello_work.exe)が存在する。
test_hello_work.exeを実行すればアプリを起動するが、Seleniumの場合、このままではまだ動かない。
dist\test_hello_workディレクトリにlibフォルダを作成し、ChromeDriver(chromedriver.exe)を配置する。
以上で、chromedriver.exeを実行してアプリを起動できるようになる。
第3者に配布する場合、distフォルダのプロジェクト名のフォルダ(test_hello_work)を配布する。
- 終わり
PythonでWEBアプリにPOSTデータを送信する
WEBアプリ(HTML)
	<div>
	<?php var_dump($_POST); ?>
	</div>
Python
import urllib.request, urllib.parse
data = {
    "neko_name": "帽子猫",
    "age": 0,
    "memo": "弱弱しい猫ちゃんです。"
}
# ここでエンコードして文字→バイトにする!
data = urllib.parse.urlencode(data).encode("utf-8")
with urllib.request.urlopen("http://localhost/selenium_scraping_demo/post_to_web/web/post_to_web_page1.php", data=data) as res:
   html = res.read().decode("utf-8")
   print(html)
出力
<div>
array(3) {
  ["neko_name"]=>
  string(9) "帽子猫"
  ["age"]=>
  string(1) "0"
  ["memo"]=>
  string(33) "弱弱しい猫ちゃんです。"
}
</div>
画像を1枚、WEBアプリにアップロード
WEBアプリ(PHP)
<div>
<?php var_dump($_POST); ?>
<hr>
<?php var_dump($_FILES);?>
</div>
Python
import requests
url = "http://localhost/selenium_scraping_demo/post_to_web/web/post_to_web_page1.php"

# 送信データ
neko_name = "ボーシ猫"
neko_age = "0.5"
sendData = {'neko_name': neko_name, 'neko_age': neko_age}

image = "imori.jpg"
data = open(image, 'rb')
file = {'file': data}

res = requests.post(url, data=sendData, files=file)
print(res.text)
出力
<div>
array(2) {
  ["neko_name"]=>
  string(12) "ボーシ猫"
  ["neko_age"]=>
  string(3) "0.5"
}
<hr>
array(1) {
  ["file"]=>
  array(5) {
    ["name"]=>
    string(9) "imori.jpg"
    ["type"]=>
    string(0) ""
    ["tmp_name"]=>
    string(24) "C:¥xampp¥tmp¥php5C51.tmp"
    ["error"]=>
    int(0)
    ["size"]=>
    int(134741)
  }
}
</div>
複数画像をWEBアプリにアップロード
WEBアプリ(PHP)
<div>
<?php 	var_dump($_POST); ?>
<hr>
<?php var_dump($_FILES);?>
</div>
Python
import requests

# 送信データ
neko_name = "ボーシ猫"
neko_age = "0.5"
sendData = {'neko_name': neko_name, 'neko_age': neko_age}

images = {}
for i, f in enumerate(["imori.jpg", "tamamusi.jpg"]):
    tiw = open(f, "rb") # io.TextIOWrapper
    images[f] = tiw.read()

url = "http://localhost/selenium_scraping_demo/post_to_web/web/post_to_web_page1.php"
res = requests.post(url, data=sendData, files=images)
print(res.text)
出力
<div>
array(2) {
  ["neko_name"]=>
  string(12) "ボーシ猫"
  ["neko_age"]=>
  string(3) "0.5"
}
<hr>
array(2) {
  ["imori_jpg"]=>
  array(5) {
    ["name"]=>
    string(9) "imori.jpg"
    ["type"]=>
    string(0) ""
    ["tmp_name"]=>
    string(23) "C:¥xampp¥tmp¥phpAF4.tmp"
    ["error"]=>
    int(0)
    ["size"]=>
    int(134741)
  }
  ["tamamusi_jpg"]=>
  array(5) {
    ["name"]=>
    string(12) "tamamusi.jpg"
    ["type"]=>
    string(0) ""
    ["tmp_name"]=>
    string(23) "C:¥xampp¥tmp¥phpB05.tmp"
    ["error"]=>
    int(0)
    ["size"]=>
    int(36015)
  }
}
</div>
pipコマンドについて
pipはパッケージをインストールするコマンド。例えばexe化するためのパッケージ「pyinstaller」をpipでインストールする場合、以下のようなコマンドを実行する。
$ python -m pip install pyinstaller
pipの本体はScriptsフォルダ内のpip.exeである。
ちなみにScriptsはpython.exeと同じディレクトリに存在する。
ディクショナリのダンプ
	import pprint

	data = [
	    {'animal_name': 'ネコ', 'age': 3, 'place': '家の中'},
	    {'animal_name': 'イヌ', 'age': 4, 'place': '家の外'}
	    ]


	print('print')
	print(data)

	print('pprint')
	pprint.pprint(data)
print
[{'animal_name': 'ネコ', 'age': 3, 'place': '家の中'}, {'animal_name': 'イヌ', 'age': 4, 'place': '家の外'}]
pprint
[{'age': 3, 'animal_name': 'ネコ', 'place': '家の中'},
 {'age': 4, 'animal_name': 'イヌ', 'place': '家の外'}]
ソースコード(GitHub)
指定ディレクトリの全階層にあるサブディレクトリとファイルの名前をすべて取得する
	import os

	cur_dp = os.getcwd()
	print (cur_dp)

	# sampleディレクトリの全階層にあるサブディレクトリとファイルの名前をすべて取得する
	for curDir, dirs, files in os.walk('./sample'):
	    print('---')
	    print(curDir)
	    print(dirs)
	    print(files)
sampleディレクトリ

出力
C:\Users\user\git\python_sample\a001
---
./sample
['subdir']
['f0000648_eyecatch00.png', 'sirohara.jpeg']
---
./sample\subdir
['subdir2']
['17668.jpg', 'graipfruit2.png']
---
./sample\subdir\subdir2
[]
['imori.png', 'kinobori.jpg']
ソースコード(GitHub)
指定したパス内に存在するファイルとディレクトリの名前をすべて取得する。 | os.listdir
ソースコード
	import os

	print ('指定したパス内に存在するファイルとディレクトリの名前をすべて取得する。 | os.listdir')

	flist = os.listdir('./sample')
	print(flist)
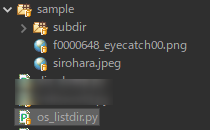
sampleディレクトリ
出力
指定したパス内に存在するファイルとディレクトリの名前をすべて取得する。 | os.listdir
['f0000648_eyecatch00.png', 'sirohara.jpeg', 'subdir']
ソースコード GitHub