拡張デバッグ関数infoEx:リレーションやモデルからなるコンポーネントに対応
app\Helpers\CommonFunctions.php
<?php
use Illuminate¥Database¥Eloquent¥Model;

// 共通関数の記述場所


/**
 * カスタムデータダンプ関数
 *
 * @note
 * この関数は開発用で、複雑で多重構造のデータのダンプに利用できます。
 * 標準のinfo()関数のように使用できます。標準のinfo()関数では、値がエンコードされて読みづらくなったり、長すぎる文字列によってデータ構造が把握しにくくなる問題があります。
 * infoEx()関数は、これらの問題を解決し、データ構造を視覚的に理解しやすくするために設計されています。
 * 特に、長い文字列を最大30文字にトリムして表示することで、構造を把握しやすくしています。開発時のデバッグにご活用ください。
 */
if (!function_exists('infoEx')) {
	function infoEx($data) {
		$log_text = _infoEx0($data);
		info($log_text);
	}
}

if (!function_exists('_infoEx0')) {
	function _infoEx0($value, $indent = 0, $p_key = 'なし', $all_text = '', $deep = 0) {
		$indentation = str_repeat(' ', $indent);

		if (is_array($value) || is_object($value)) {
			$class_name = '';
			if(is_array($value)) $class_name = 'Array';
			if(is_object($value)) $class_name = get_class($value);

			$all_text .= "{$indentation} 階層{$deep}: キー=>{$p_key}: クラス名=>" . $class_name . "¥n";
			$deep ++;

			if ($value instanceof Model) {

				$dataArray = $value->toArray();
				foreach ($dataArray as $key => $value2) {
					$all_text = _infoEx0($value2, $indent + 4, $key, $all_text, $deep);
				}
			}else{
				foreach ($value as $key => $value2) {
					$all_text = _infoEx0($value2, $indent + 4, $key, $all_text, $deep);
				}
			}


		} else {
			$valueString = (string)$value;
			$shortenedValue = strlen($valueString) > 30 ? substr($valueString, 0, 30) . '...' : $valueString;
			$all_text .= "{$indentation}{$p_key}: " . gettype($value) . "=>" . $shortenedValue . "¥n";
		}


		return $all_text;

	}
}
app\Helpers\CommonFunctions.phpを組み込む場所
config/app.phpの末尾付近に以下のコードを記述する。
    'autoload_files' => [
            base_path('app/Helpers/CommonFunctions.php'),
    ],
シンプルなINSERTとUPDATE
シンプルなINSERT
	$ent = [
			'monitor_updated' => '2024-08-27 21:50:23',
			'monitor_data_count' => 218,
			'monitor_counter' => 0,
			'memo' => 'none',
			'sort_no' => 0,
			'updated_at' => date('Y-m-d H:i:s'),
	];

	DB::table('monitors')->insert($ent);
シンプルなUPDATE
	DB::table('monitors')
		->where('id', $latestMonitor->id) // ここでidを指定
		->update((array)$latestMonitor);
Google Custom Search JSON API でGoogle検索結果を取得する方法
コンソールコマンドにサンプル- Google Cloud Platformにログインします。
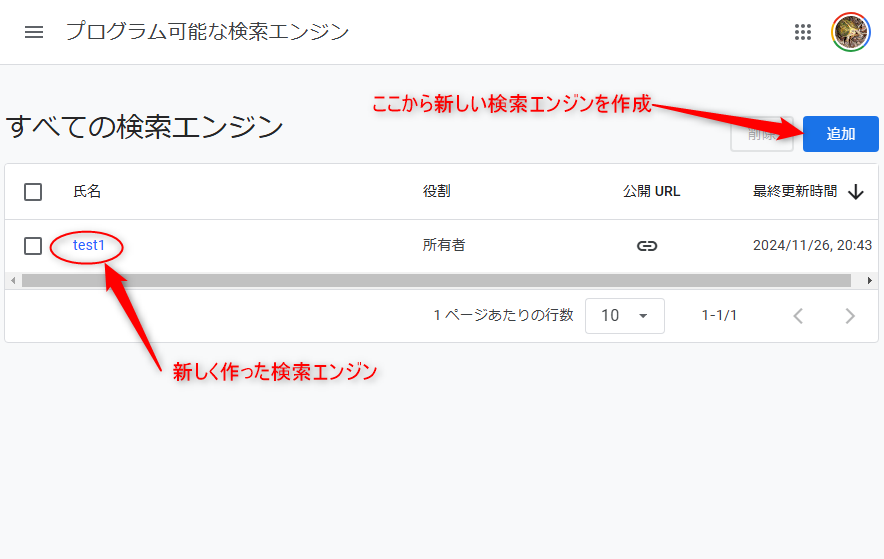
- プログラム可能な検索エンジン のページを開き、新しい「検索エンジン」を作成します。
-
検索エンジン作成時に発行される検索エンジンIDを控えておきます。
<script async src="https://cse.google.com/cse.js?cx=7531省略4f5b"></script>
-
作成した検索エンジンの設定ページをもう一度開き、
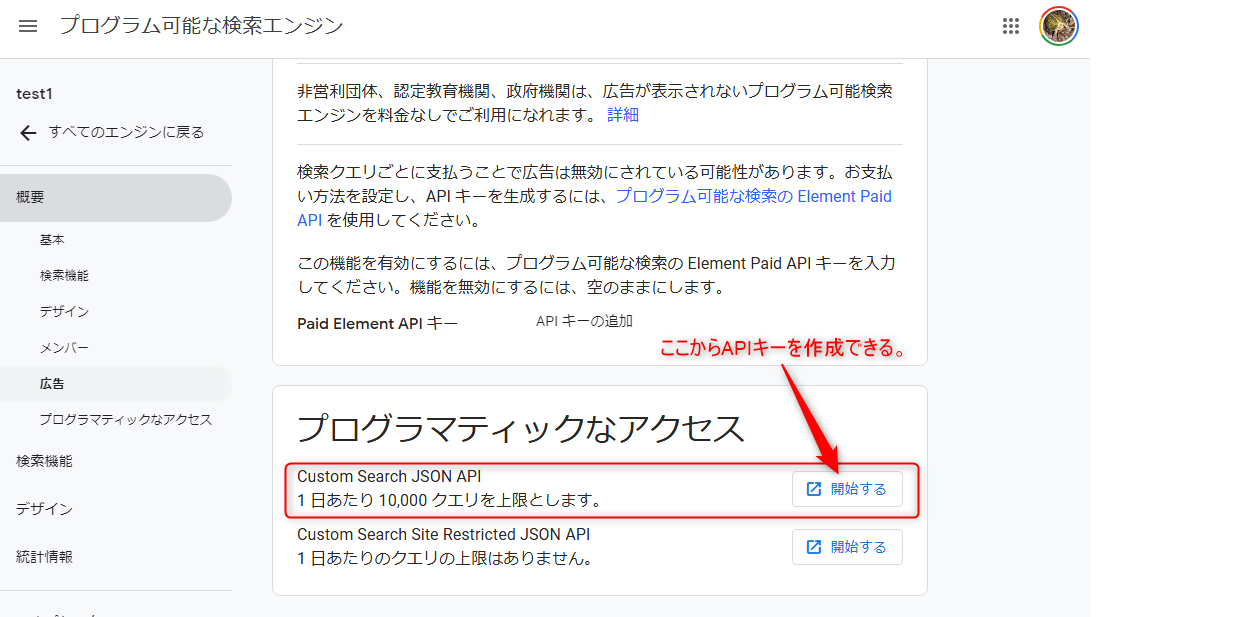
「Custom Search JSON API」の箇所からAPIキーを取得しにいきます。

-
Windowsでxamppを仕様している場合、SSL関連のファイルを配置する必要があります。
cacert.pemのダウンロード( https://curl.se/ca/cacert.pem) し、「C:/xampp/php/extras/ssl」ディレクトリに配置します。 -
xamppのコントロールパネルからphp.iniを開き、下記の記述を行います。
	curl.cainfo = "C:/xampp/php/extras/ssl/cacert.pem"
	openssl.cafile = "C:/xampp/php/extras/ssl/cacert.pem"
記述したらApatchを再起動します。 - LaravelのコンソールコマンドでGoogle検索結果を取得するサンプルを作成します。 まずはLaravelのプロジェクトを用意します。
-
作成したLravelのプロジェクトに専用パッケージをcomposerで追加します。
composer require google/apiclient
(php composer.phar require google/apiclient) -
Laravelのコンソールコマンドとして処理を作成します。
app/Console/Commands/GoogleCustomSearchDemo.php<?php namespace App¥Console¥Commands; use Illuminate¥Console¥Command; use Google¥Client; // Google API Clientのクラスをインポート use Google¥Service¥CustomSearchAPI; // CustomSearchAPIのクラスをインポート use Exception; // Exceptionクラスもインポート class TestBatch extends Command { /** * The name and signature of the console command. * * @var string */ protected $signature = 'batch:gcs'; /** * The console command description. * * @var string */ protected $description = 'Command description'; /** * Execute the console command. */ public function handle() { echo 'バッチ処理を開始します。' . PHP_EOL; $API_KEY = 'AIza 省略 IM8XKs'; // 取得したAPIキーを入力 $SEARCH_ENGINE_ID = '7531 省略 f5b'; // 取得した検索エンジンIDを入力 try { // Google API Clientを設定 $client = new Client(); $client->setApplicationName('Your Application Name'); $client->setDeveloperKey($API_KEY); $service = new CustomSearchAPI($client); // 本日と昨日の日付を取得 $today = date('Y-m-d'); $yesterday = date('Y-m-d', strtotime('-1 day')); $query = 'トレンド商品 ニュース'; // クエリに期間指定を追加 $query = $query . " after:$yesterday before:$today"; $optParams = [ 'cx' => $SEARCH_ENGINE_ID, 'q' => $query, 'num' => 10, // 取得する結果の数 ]; $results = $service->cse->listCse($optParams); foreach ($results->getItems() as $item) { echo 'タイトル: ' . $item['title'] . PHP_EOL; echo 'リンク: ' . $item['link'] . PHP_EOL; echo '概要: ' . $item['snippet'] . PHP_EOL . PHP_EOL; } } catch (Exception $e) { echo 'エラーが発生しました: ' . $e->getMessage() . PHP_EOL; } echo 'バッチ処理を終了しました。' . PHP_EOL; } } -
bashで上記のコマンドを実行する
php artisan batch:gcs
-
検索結果が取得できれば成功です。

